Reduce File Size of Microsoft PowerPoints Files
Compress pictures in your presentation
Select a picture in your document. The Picture Format tab appears.
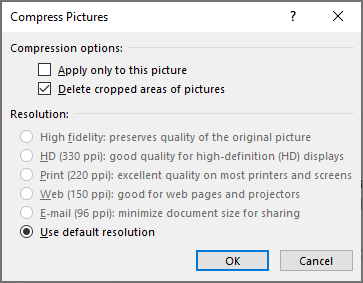
On the Picture Format tab, in the Adjust group, select Compress Pictures.
Under Compression options, do any of the following:
Make sure that Apply only to this picture is not selected so that the changes you make here will apply to all pictures in the document.
Select Delete cropped areas of pictures. This option removes the cropped picture data but note that if you delete the cropped picture data, you won't be able to restore it.
Under Resolution, select Use default resolution.
Delete image editing data and lower default resolution
By default, when you edit an image, the data from the original is retained (to ensure the image can be restored). Discarding it means that you can't restore the changes you make, but it will reduce your file size. Lowering the default resolution for images also reduces your overall file size.
Go to File > Options > Advanced.
Under Image Size and Quality, do the following:
Select Discard editing data. This option removes stored data that's used to restore the image to its original state after it's been edited. Note that if you discard editing data, you won't be able to restore the image after you edit it.
Make sure that Do not compress images in file is not selected.
- In the Default resolution list, select a resolution that is 150ppi or lower.
Reduce the character set of embedded fonts
To make your presentation more sharable with others who don't have the same fonts in their system, it's typical to embed the fonts you use. However, embedded fonts will increase your file size. To minimize the file increase, embed only those characters used in the presentation.
Go to File > Options > Save.
- Under Preserve fidelity when sharing this presentation, select Embed fonts in the file, and then select Embed only the characters used in the presentation.
Note: If you've used custom fonts and want others to edit the presentation, select Embed all characters.
Related Articles
Upload Files to Microsoft Teams
Upload a file to the Files tab Every channel has a Files tab. You'll find everything that's been shared there. Select Upload > Files or Folder. Choose your files. Source: Upload and share files (microsoft.com)Microsoft Teams Overview
Microsoft Teams: a collaboration software Microsoft Teams is an ecosystem that enables people to collaborate online. To use the toolset, you must first open the application named Microsoft Teams from the start menu. After opening the software, you ...Updating Microsoft Teams
Should Chat, Files, Video calls, etc. not work in your Microsoft Teams you may need to update it. Click 3 dots in top-right, Check for updates: Top grey bar will indicate its working on that. Eventually the bar will change, you then need to click ...Restored a deleted file in Microsoft Teams
Recover a deleted file in Microsoft Teams Open a channel and select the Files tab. Select Open in SharePoint at the top of the page In SharePoint, select Toggle navigation pane > Recycle bin. Hover over the file(s) you want to recover and select the ...Re-enable Microsoft Teams in Outlook
Can't create Teams meeting in Outlook? Teams button missing in Outlook? Quick workaround: 1. Open Microsoft Teams 2. Select Calendar on left 3. New Event top-right 4. Make sure to move the "Teams meeting" slider to the right: Method 1: Open Outlook, ...


