Charge a Dell Laptop with a Targus Laptop Power Bank
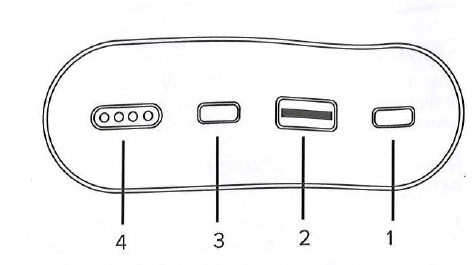
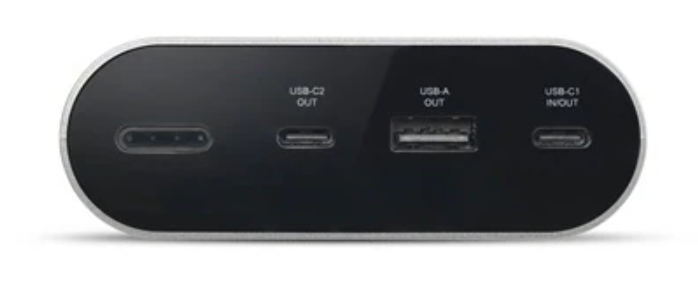
Product Overview
1. USB-C1 - USB-C INPUT/OUTPUT
2. USB-A - USB-A OUT ONLY
3. USB-C2 - USB-C OUT ONLY
4. POWER BUTTON with the LED POWER INDICATORS
Charging the Power Bank
Using the USB-C cable, connect the USB-C cable connector to the Power Bank's USB-C1 IN/OUT port,
and the other connector to a USB charger.
The 4 LED lights will begin to flash when the Power Bank is charging.
and the other connector to a USB charger.
The 4 LED lights will begin to flash when the Power Bank is charging.
When all 4 LEDs are lit, the unit is fully charged. Charging will take 3-4 hours depending on the source.
Using the Power Bank
1. To power and charge your laptop from the Power Bank, you can use the included USB-C cable, or a 100W+ rated 5A USB-C cable.
a. Connect the standard USB connector to the Power Bank
b. Connect the other end of the cable to your device.
c. Push the power button.
d. The LEDs will turn on briefly, and your device will begin to charge.
2. To check the battery level, simply press the power button, and the LEDs will indicate the remaining power level.
3. To turn off the power and LED, press and hold the power button to turn off the status LED.
4. To enable low-power mode, double-click the power button.
To return to normal mode double-click the power button.
It is recommended that you use low-power mode to charge low-power accessory devices such as Bluetooth headsets and smart watches.
To return to normal mode double-click the power button.
It is recommended that you use low-power mode to charge low-power accessory devices such as Bluetooth headsets and smart watches.

Low-power mode cannot be used to charge a laptop.
Sources:
Targus Laptop Power Bank User Guide (included with product only)
Estimated Time to Complete:
~5 minutes (T1+)
Related Articles
Resolve Dock & Monitor Issues
To make laptops work with big screens (called monitors) & keyboards/mice with wires we use a 'dock' or 'docking station'. This is a box that lots of cords plug into, then one cord goes to your laptop that makes it all work. If you trace cord that ...Update Windows Computer OS & Software
Update Windows Computer OS & Software Below are general updates that can be run without IT intervention. These updates will download and install in the background with minimal interference to your workday. You may be prompted to restart your computer ...Remote access (VPN) - Connect to AOVPN on an assigned Nexus PC
Prerequisites MFA registration must be completed. Smartphone/tablet must be nearby Assigned PC from Nexus. If possible first-time sign in should happen at Nexus office Completed Nexus Electronic Equipment Agreement (will be provided by IT staff) ...Set up Home Office Equipment
Step 1: Set up the monitor(s) using the HDMI or DisplayPort cable put in the monitor box, according to the instructions included with the monitor(s). Step 2: Remove the docking station from the box. Your docking station might look slightly different ...Office 365 - "Couldn't Verify Account" or "Unlicensed Product"
Problem: In an Microsoft 365 desktop application, such as Outlook, Word, Excel, or PowerPoint, you receive a message that your account could not be verified. "Couldn't Verify Account: We're having trouble verifying your Office 365 account on this ...