Add Microsoft Authenticator as a Multi-Factor Authentication (MFA) Method
You can use these steps to add (or restore) Microsoft Authenticator as an MFA method.
This can be used to add Microsoft Authenticator to a new phone, or to add it for the first time also.
If you have completed MFA registration in the past, you will need access to at least one of your current MFA methods to complete step 1.
To add Microsoft Authenticator as an MFA method, you will need access to two separate devices: a computer or large tablet, and a cell phone or small tablet.
Neither device needs to be Nexus owned.
1. On a computer or large tablet, go to: https://aka.ms/mfasetup - If prompted, sign in with your Nexus provided work email address, computer password, and approve your current MFA method.
If you are prompted to approve in Microsoft Authenticator, and that method is not available, please select "I can't use the app right now", and select one of your backup MFA methods, if available. Please contact the Nexus Service Desk if none of your registered MFA methods are available. You can open a ticket at the bottom of this page or call us at 763-251-6211.
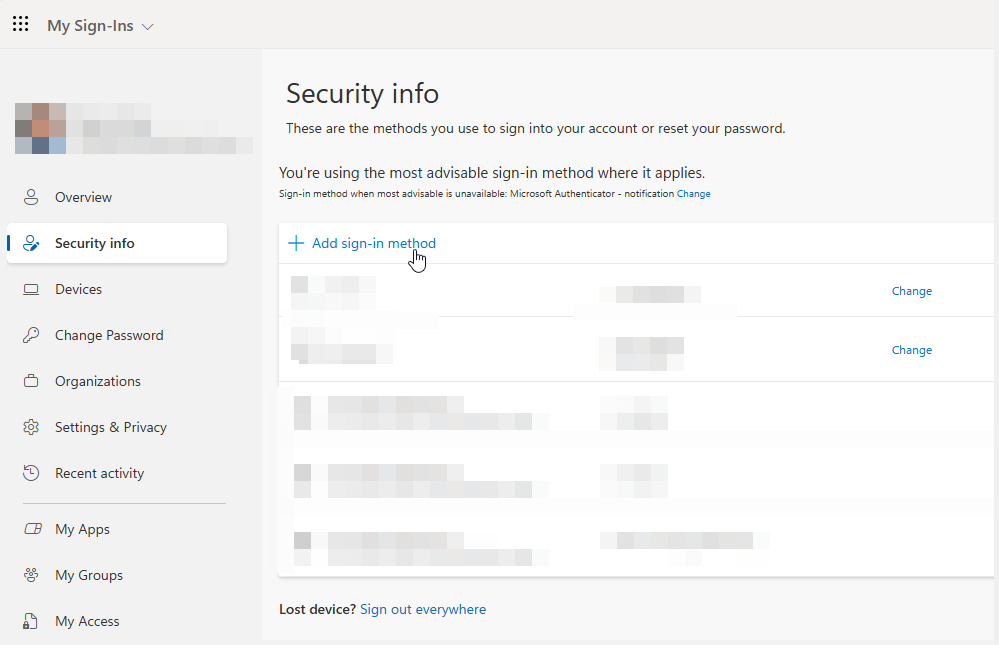
2. Then click + Add sign-in method

3. Select Microsoft Authenticator
6. On your cell phone or small tablet, open the Microsoft Authenticator app. You may need to search for specifically "Microsoft Authenticator" in the Play Store or App Store. Click Next on the computer.
7. Please do not attempt to sign in to the Microsoft Authenticator app using your Nexus credentials.
Instead, please look for an option to Scan QR code in the Microsoft Authenticator app on your cell phone or small tablet.
If you do not see one, select the three dots in top corner, select Add account, tap work or school account (tap the actual word "Work", not the (i)), tap Scan a QR code
Instead, please look for an option to Scan QR code in the Microsoft Authenticator app on your cell phone or small tablet.
If you do not see one, select the three dots in top corner, select Add account, tap work or school account (tap the actual word "Work", not the (i)), tap Scan a QR code
Click Next again on the computer.
7. Scan the QR code displayed on the computer using the Microsoft Authenticator app on your cell phone.
Once it says the account was successfully added, click Next on the computer.
8. It will send a test approval request to the app. Please approve the request from your cell phone. You will likely need to enter your cell phone PIN or scan your fingerprint.
9. Once the notification is approved, please press Next on the computer.
10. You are all set!
Microsoft Authenticator on your cell phone will be your primary method, allowing access to Remote Desktop (RDS) and most other Nexus resources remotely.
You other method(s) will remain as a backup method, which you can use if your Microsoft Authenticator app is not available, by selecting the option "I don't have access to the Microsoft Authenticator app right now".
Estimated time to complete:
~10 minutes (T1) +
~10 minutes (T1) +
Related Articles
2-MFA setup on an iPhone/iPad
Multi Factor Authentication (MFA) is a secondary authentication method besides a password; commonly a code from a text, call, or app. This is also sometimes call two-step verification. Click here for more info. Prerequisites (WHAT you will need) ...2-MFA setup on an Android Google smartphone/tablet
Multi Factor Authentication (MFA) is a secondary authentication method besides a password; commonly a code from a text, call, or app. This is also sometimes call two-step verification. Click here for more info. Prerequisites (WHAT you will need) ...1-What is MFA Multi Factor Authentication
WHAT is MFA Multi-Factor Authentication (MFA) means providing a secondary authentication method besides a password; commonly a code from a text, call, or app. This is also sometimes call two-step verification. WHY do we need it This is an enhanced ...Sign in to Nexus Sites/Apps from Personal Devices via SSO & Multi Factor Authentication (MFA)
Multi Factor Authentication (MFA) is a secondary authentication method besides a password, commonly a code from a text, call, or app. This is also sometimes called two-step verification. Click here for more info. SSO: Single Sign-On is a method to ...Add Members to a Team in Teams
If you're a team owner, you can add someone to a team. If you're not a team owner, you can submit a request and the team owner can then accept or deny it. This topic is about adding members who are already a part of your team's org. If you want to ...